|
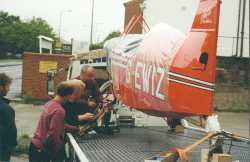
Having
operated G-EWIZ for a season, the decision to take her out of
the air for five or six months was quite a scary one: the decision
was finalised in the autumn of 1996, but were we biting off more
than we could chew?
 The
first, most obvious requirement was to find somewhere large enough
in which to work: a large shed or factory unit, close by, would
be ideal. After a fairly extensive period of head scratching,
Dave Howdle (then co-owner) suggested that we use the old outhouses
close to his textile works in Rotherham, South Yorkshire. We decided
on two smallish rooms at one end of the building; one for storage
and one to carry out the work. Both rooms required a thorough
clean out, and an old aeromodelling friend of Dave's, nicknamed
Mac, kindly built a large polythene tent inside the larger of
the two rooms in order to create a relatively clean and controlled
environment. The integrity of this structure would prove to be
crucial during the latter stages of the restoration when we were
spraying the top coat. The
first, most obvious requirement was to find somewhere large enough
in which to work: a large shed or factory unit, close by, would
be ideal. After a fairly extensive period of head scratching,
Dave Howdle (then co-owner) suggested that we use the old outhouses
close to his textile works in Rotherham, South Yorkshire. We decided
on two smallish rooms at one end of the building; one for storage
and one to carry out the work. Both rooms required a thorough
clean out, and an old aeromodelling friend of Dave's, nicknamed
Mac, kindly built a large polythene tent inside the larger of
the two rooms in order to create a relatively clean and controlled
environment. The integrity of this structure would prove to be
crucial during the latter stages of the restoration when we were
spraying the top coat.
The work commenced in January 1997, under the supervision of Rob
Millinship of Aerographic. I cut my teeth on recovering the newly
stove enamelled tailplanes, elevators and rudder; learning the
basic covering techniques and rib stitching. For those of you
contemplating a similar project, this sort of job, along with
paint stripping cowls and side panels, can be carried out on a
small scale in the comfort of your own garage, or for the more
fortunate amongst you, the warmth of your kitchen!
Just
to make life more exciting, Elaine and I were moving house at
this stage, and arrived at our new home on a Thursday morning:
the bottom wings arrived by trailer on Friday evening! I spent
the weekend outside, stripping fabric and glue off the structure
and on Monday morning, Rob and I were busy recovering the wings
in the kitchen and dining room. Oddly enough the original owner
of the house just happened to pop by at lunchtime; and there was
much hilarity when Rob metioned that I had only bought the house
to use as a workshop!
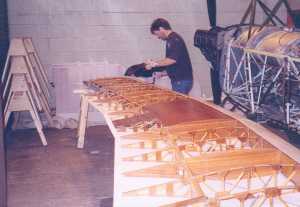
The wings were rib stitched and trailered up the M1 to Rotherham
where they joined the remainder of the aeroplane, now reduced
to a pile of bits. Rib stitching, by the way, is a nice clean
job, and it's very satisfying when you get the tops of the loops
nicely lined up: it's a bit tough on your back though and it does
make you look at other peoples efforts with a critical eye!
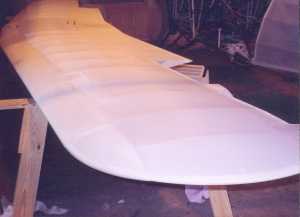
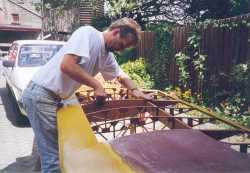
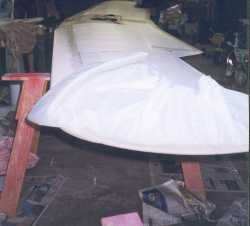
 We
stripped the top wing and cleaned the aluminium leading edges
ready for fabric; unfortunately, we did not think to check the
tension in the drag/anti-drag wires. This oversight was not unreasonable,
given our knowledge of the airframe at the time. The wires looked
to be correctly tensioned, but unfortunatley were not (more of
this later). Having replaced the trailing edge with a beefier
section, the fabric went on easily and was really a repeat performance
of the bottom set of wings. Starting with the underside, the fabric
was taken from around the top of the D box underneath the ribs
and up and around onto the top of the trailing edge. The upper
surface, overlapping similarly, by running from the bottom of
the D box around the leading edge, over the ribs, and back to
the underside of the trailing edge. This system tends to hide
or at least disguise any signs of the overlap; in fact, by the
time the wing was taped up, there were no telltale edges to speak
of. We
stripped the top wing and cleaned the aluminium leading edges
ready for fabric; unfortunately, we did not think to check the
tension in the drag/anti-drag wires. This oversight was not unreasonable,
given our knowledge of the airframe at the time. The wires looked
to be correctly tensioned, but unfortunatley were not (more of
this later). Having replaced the trailing edge with a beefier
section, the fabric went on easily and was really a repeat performance
of the bottom set of wings. Starting with the underside, the fabric
was taken from around the top of the D box underneath the ribs
and up and around onto the top of the trailing edge. The upper
surface, overlapping similarly, by running from the bottom of
the D box around the leading edge, over the ribs, and back to
the underside of the trailing edge. This system tends to hide
or at least disguise any signs of the overlap; in fact, by the
time the wing was taped up, there were no telltale edges to speak
of.
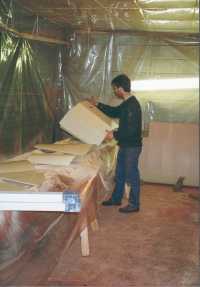
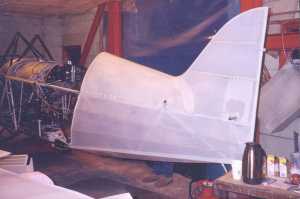
 Much
of the early work on the fuselage involved stripping, cleaning
and beautifying edges of cowls, side panels, fittings and fairings
ready for primer. With three people on the go, the job was not
quite so tedious as it might have been. It's at this stage, just
prior to primer, when you're laying out all the bits, that you
realise just how much space is required even for a small aeroplane
like a Pitts when it's in kit form. Much
of the early work on the fuselage involved stripping, cleaning
and beautifying edges of cowls, side panels, fittings and fairings
ready for primer. With three people on the go, the job was not
quite so tedious as it might have been. It's at this stage, just
prior to primer, when you're laying out all the bits, that you
realise just how much space is required even for a small aeroplane
like a Pitts when it's in kit form.
In an ideal world, this sort of work would be carried out in a
large workshop just outside your back door, so that you could
pop outside for half an hour, and perhaps stick a coat of dope
on, or drill a few holes. My sixty mile round trip up and down
the M1 was getting slightly tedious, so the best way to speed
things up was to go up to Rotherham before of after work, according
to my shift pattern; and sometimes carry out my stand by duties
for the company from there. Turning up in the crew room at East
Midlands Airport, smelling of cellulose thinners like some sort
of substance addict, became a regular occurence; and dried on
superseam gives you something to pick at when you're stuck in
traffic.
Apart from simply covering the aeroplane, we decided to add some
extra aluminium side panels as far back as the rear of the cockpit.
Strips of 4130 were welded to the structure, to which we then
riveted the captive nuts; this made a great improvement to the
aeroplane's appearance, and it is know pretty much standard practise
at the factory.
 February
and March were spent getting the basics right, and by April/May,
we were spending some time doping the flying services and spraying
side panels. Apart from Mac's jokes, humidity and contamination
were the two biggest problems for us. Being so close to the pennines,
the air was sometimes too damp for spraying. Contamination, possibly
from David's factory, lead us to adopt almost obsessive levels
of cleanliness. We did make progress, but found ourselves, on
the odd occasion, rejecting 25% to 30% of the panels and fittings,
and these would simply be flatted back ready for respraying. February
and March were spent getting the basics right, and by April/May,
we were spending some time doping the flying services and spraying
side panels. Apart from Mac's jokes, humidity and contamination
were the two biggest problems for us. Being so close to the pennines,
the air was sometimes too damp for spraying. Contamination, possibly
from David's factory, lead us to adopt almost obsessive levels
of cleanliness. We did make progress, but found ourselves, on
the odd occasion, rejecting 25% to 30% of the panels and fittings,
and these would simply be flatted back ready for respraying.
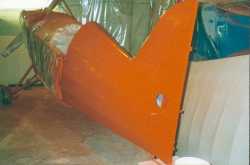
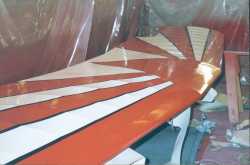
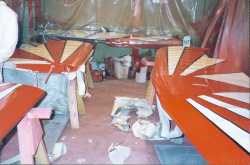
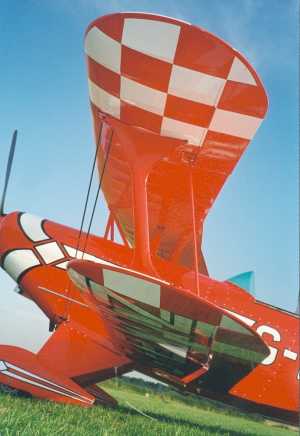
The
paint scheme was almost factory standard, except for the addition
of the chequer board and the choice of a very bright automotive
red. Lettering and chequer board stencils were cut by computer
from sticky plastic and made the job of masking up that little
bit easier and more impressive.
  Basic
reassembly of the fuselage was carried out in Rotherham and the
whole lot was then transported to Netherthorpe airfield for final
rigging and re-weighing prior to flight in July. Basic
reassembly of the fuselage was carried out in Rotherham and the
whole lot was then transported to Netherthorpe airfield for final
rigging and re-weighing prior to flight in July.
The
drag/anti-drag wire saga came to a head two years later after
we experienced repeated damage to the trailing edge of the top
wing. Alarm bells finally rang and we realised that some fabric
repair work had been carried out prior to our involvement with
the aeroplane. We conjectured that the top wing had been flexing
ever so slightly back and forth as the aerodynamic loads varied
with speed; this put the trailing edge under compression, causing
it to fail: it had probably been like that since the aeroplane
had been built in 1982. In July 1999 the top wing was removed
and trailered to the house next door to us: they just happened
to have a garage long enough to take the top wing of a Pitts!
The fabric was stripped, wires correctly tensioned, and wooden
leading and trailing edges added to improve the bracing still
further: an expensive oversight!
Overall,
the aeroplane is in much better condition now that it has been
for a while; my knowledge of the structure and its limitations
has improved, and this is no bad thing when you're flying some
maneouvers! I now see myself not so much the owner of an aeroplane,
but rather as one of many who will look after it (and thats just
what you tell the nice lady at the bank!).
|